1. 主从简介
为了解决以下典型两个问题,我们导入主从学习
- 用一台数据库存放数据,若此数据库服务器宕机了导致数据丢失怎么办?
- 业务量大了,数据多了,访问的人多了,一台数据库无法保证服务质量了怎么办?
1.1 主从作用
- 实时灾备,用于故障切换
- 读写分离,提供查询服务
- 备份,避免影响业务
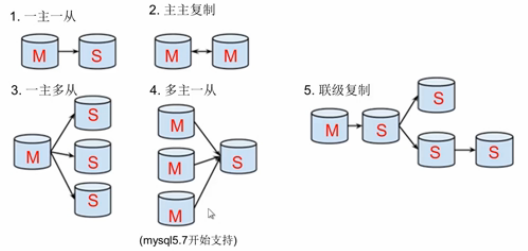
1.2 主从形式

- 一主一从
- 主主复制
- 一主多从---扩展系统读取的性能,因为读是在从库读取的
- 多主一从---5.7开始支持
- 联级复制
2. 主从复制原理

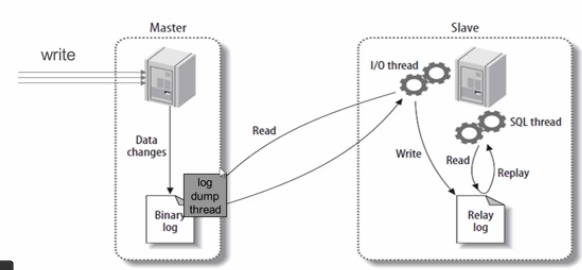
主从复制步骤:
- 主库将所有的写操作记录到binlog日志中并生成一个log dump线程,将binlog日志传给从库的I/O线程
- 从库生成两个线程,一个I/O线程,一个SQL线程
- I/O线程去请求主库的binlog,并将得到的binlog日志写到relay log(中继日志) 文件中
- SQL线程,会读取relay log文件中的日志,并解析成具体操作,来实现主从的操作一致,达到最终数据一致的目的
3. 主从复制配置
主从复制配置步骤:
1)确保从数据库与主数据库里的数据一样2)在主数据库里创建一个同步账号授权给从数据库使用3)配置主数据库(修改配置文件)4)配置从数据库(修改配置文件)
需求: 搭建三台MySQL服务器,一台作为主服务器,其它两台作为从服务器(其中一项主从为主库中存有数据,另一项主库中没有数据),主服务器进行写操作,从服务器进行读操作
环境说明:
| 数据库角色 | IP | 应用与系统版本 | 有无数据 |
|---|---|---|---|
| 主数据库 | 192.168.56.20 | centos7/redhat7mysql-5.7 | 先没有数据,后面创建数据 |
| 从数据库 | 192.168.56.22 | centos7/redhat7mysql-5.7 | 无数据 |
| 从数据库 | 192.168.56.23 | centos7/redhat7mysql-5.7 | 无数据 |
3.1 mysql安装
分别在主从三台服务器上安装mysql-5.7版本
安装主服务器(192.168.56.20)
//解压安装包至/usr/local下[root@20liuzhenchao ~]# tar xf mysql-5.7.22-linux-glibc2.12-x86_64.tar.gz -C /usr/local///创建用户和组[root@20liuzhenchao ~]# groupadd -r mysql [root@20liuzhenchao ~]# useradd -M -s /sbin/nologin -g mysql mysql //创建软链接并修改/usr/local/mysql目录属组 [root@20liuzhenchao local]# ln -sv mysql-5.7.22-linux-glibc2.12-x86_64/ mysql "mysql" -> "mysql-5.7.22-linux-glibc2.12-x86_64/" [root@20liuzhenchao local]# chown -R mysql.mysql mysql* [root@20liuzhenchao local]# ll |grep mysql lrwxrwxrwx 1 mysql mysql 36 5月 15 22:55 mysql -> mysql-5.7.22-linux-glibc2.12-x86_64/ drwxr-xr-x 9 mysql mysql 129 5月 15 22:46 mysql-5.7.22-linux-glibc2.12-x86_64 //添加环境变量 [root@20liuzhenchao local]# echo 'export PATH=/usr/local/mysql/bin:$PATH' > /etc/profile.d/mysql.sh [root@20liuzhenchao local]# . /etc/profile.d/mysql.sh //建立数据存放目录 [root@20liuzhenchao ~]# mkdir /opt/data [root@20liuzhenchao ~]# chown -R mysql.mysql /opt/data [root@20liuzhenchao ~]# ll /opt/data -d drwxr-xr-x 2 mysql mysql 6 5月 15 23:02 /opt/data //初始化数据库 [root@20liuzhenchao ~]# mysqld --initialize --user=mysql --datadir=/opt/data 2019-05-15T15:04:16.463631Z 0 [Warning] TIMESTAMP with implicit DEFAULT value is deprecated. Please use --explicit_defaults_for_timestamp server option (see documentation for more details). 2019-05-15T15:04:16.837927Z 0 [Warning] InnoDB: New log files created, LSN=45790 2019-05-15T15:04:16.899304Z 0 [Warning] InnoDB: Creating foreign key constraint system tables. 2019-05-15T15:04:17.011781Z 0 [Warning] No existing UUID has been found, so we assume that this is the first time that this server has been started. Generating a new UUID: b58e7a1c-7722-11e9-b5d5-000c29fc116c. 2019-05-15T15:04:17.012413Z 0 [Warning] Gtid table is not ready to be used. Table 'mysql.gtid_executed' cannot be opened. 2019-05-15T15:04:17.013201Z 1 [Note] A temporary password is generated for root@localhost: e88-hL,1?YRT//此处临时密码为:e88-hL,1?YRT //修改配置文件 [root@20liuzhenchao ~]# vim /etc/my.cnf [mysqld] datadir=/opt/data socket=/tmp/mysql.sock //配置服务启动脚本 [root@20liuzhenchao ~]# cp -a /usr/local/mysql/support-files/mysql.server /etc/init.d/mysqld [root@20liuzhenchao ~]# sed -ri 's#^(basedir=).*#\1/usr/local/mysql#g' /etc/init.d/mysqld [root@20liuzhenchao ~]# sed -ri 's#^(datadir=).*#\1/opt/data#g' /etc/init.d/mysqld //启动mysql [root@20liuzhenchao ~]# service mysqld start Starting MySQL. SUCCESS! [root@20liuzhenchao ~]# ss -antl|grep 3306 LISTEN 0 80 :::3306 :::* //修改密码 [root@20liuzhenchao ~]# mysql -uroot -p'e88-hL,1?YRT' -e 'set password=password("liu123!");' --connect-expired-password mysql: [Warning] Using a password on the command line interface can be insecure. 从服务器(192.168.56.22 和 192.168.56.23)的安装和上类似,此处略
3.2 mysql主从配置之主、从数据库均为初始化,没有数据
主数据没有数据——从数据库(192.168.56.22)与主数据库(192.168.56.20)均为初始化状态
3.2.1 在主数据库里创建一个同步账号授权给从数据库使用
mysql> create user 'repl'@'192.168.56.22' identified by 'liu123!';Query OK, 0 rows affected (0.00 sec) mysql> grant replication slave on *.* to 'repl'@'192.168.56.22'; Query OK, 0 rows affected (0.00 sec) mysql> flush privileges; Query OK, 0 rows affected (0.00 sec)
3.2.2 配置主数据库
[root@20liuzhenchao ~]# vim /etc/my.cnf[mysqld]datadir=/opt/datasocket=/tmp/mysql.sock# Disabling symbolic-links is recommended to prevent assorted security riskssymbolic-links=0//添加下面两行log-bin=mysql-bin //启用binlog日志server-id=1 //数据库服务器唯一标识符,主库的server-id值必须比从库的小//重启mysql服务[root@20liuzhenchao ~]# service mysqld restartShutting down MySQL.. SUCCESS! Starting MySQL. SUCCESS! [root@20liuzhenchao ~]# ss -antl |grep 3306LISTEN 0 80 :::3306 :::* //查看主库的状态mysql> show master status; +------------------+----------+--------------+------------------+-------------------+ | File | Position | Binlog_Do_DB | Binlog_Ignore_DB | Executed_Gtid_Set | +------------------+----------+--------------+------------------+-------------------+ | mysql-bin.000001 | 154 | | | | +------------------+----------+--------------+------------------+-------------------+ 1 row in set (0.00 sec) mysql>
3.2.3 配置从数据库
[root@22liuzhenchao ~]# vim /etc/my.cnf[mysqld]datadir=/opt/datasocket=/tmp/mysql.sock# Disabling symbolic-links is recommended to prevent assorted security risks symbolic-links=0 //添加下面两行 server-id=2 //设置从库的唯一标识符,从库的server-id值必须大于主库的该值 relay-log=mysql-relay-bin //启用中继日志relay-log //重启从库的mysql服务 [root@22liuzhenchao ~]# service mysqld restart Shutting down MySQL.. SUCCESS! Starting MySQL. SUCCESS! [root@22liuzhenchao ~]# ss -antl|grep 3306 LISTEN 0 80 :::3306 :::* //配置并启动主从复制 mysql> change master to master_host='192.168.56.20',master_user='repl',master_password='liu123!',master_log_file='mysql-bin.000001',master_log_pos=154; Query OK, 0 rows affected, 2 warnings (0.01 sec) mysql> start slave; Query OK, 0 rows affected (0.00 sec) //查看从服务器状态 mysql> show slave status \G *************************** 1. row *************************** Slave_IO_State: Waiting for master to send event Master_Host: 192.168.56.20 Master_User: repl Master_Port: 3306 Connect_Retry: 60 Master_Log_File: mysql-bin.000001 Read_Master_Log_Pos: 154 Relay_Log_File: mysql-relay-bin.000002 Relay_Log_Pos: 320 Relay_Master_Log_File: mysql-bin.000001 Slave_IO_Running: Yes //此处必须为Yes Slave_SQL_Running: Yes //此处必须为Yes Replicate_Do_DB:
3.2.4 测试验证
在主服务器中创建库liuzhenchao,并插入表student
mysql> create database liuzhenchao;Query OK, 1 row affected (0.00 sec)mysql> use liuzhenchao;Database changedmysql> create table student(id int(10) not null,name varchar(50) not null);Query OK, 0 rows affected (0.01 sec)mysql> insert student values(1,'zhangshan'),(2,'lisi'),(3,'wangwu');Query OK, 3 rows affected (0.03 sec)Records: 3 Duplicates: 0 Warnings: 0mysql> select * from student;+----+-----------+| id | name | +----+-----------+ | 1 | zhangshan | | 2 | lisi | | 3 | wangwu | +----+-----------+ 3 rows in set (0.00 sec)
在从数据库中查看数据是否同步:
mysql> select * from liuzhenchao.student;+----+-----------+| id | name |+----+-----------+| 1 | zhangshan || 2 | lisi || 3 | wangwu |+----+-----------+3 rows in set (0.00 sec)
3.3 mysql主从配置之主数据库有数据
主数据库中有数据——从数据库(192.168.56.23)为初始化状态;主数据库(192.168.56.20)中有创建的数据
3.3.1 为确保从数据库与主数据库里的数据一样,先全备主数据库并还原到从数据库中
//先查看主库有哪些库[root@20liuzhenchao ~]# mysql -uroot -p'liu123!' -e 'show databases;'mysql: [Warning] Using a password on the command line interface can be insecure.+--------------------+| Database |+--------------------+| information_schema | | liuzhenchao | | mysql | | performance_schema | | sys | +--------------------+ //再查看从库有哪些库 [root@23liuzhenchao ~]# mysql -uroot -p'liu123!' -e 'show databases;' mysql: [Warning] Using a password on the command line interface can be insecure. +--------------------+ | Database | +--------------------+ | information_schema | | mysql | | performance_schema | | sys | +--------------------+ //全备主库 //全备主库时需要另开一个终端,给数据库加上读锁,避免在备份期间有其他人在写入导致数据不一致 mysql> flush tables with read lock; Query OK, 0 rows affected (0.00 sec) //此锁表的终端必须在备份完成以后才能退出 //备份主库并将备份文件传送到从库 [root@20liuzhenchao ~]# mysqldump -uroot -p'liu123!' --all-databases > /opt/all-201905151640.sql mysqldump: [Warning] Using a password on the command line interface can be insecure. [root@20liuzhenchao ~]# ls /opt |grep all all-201905151640.sql [root@20liuzhenchao ~]# scp /opt/all-201905151640.sql root@192.168.56.23:/opt/ root@192.168.56.23's password: all-201905151640.sql 100% 784KB 13.2MB/s 00:00 //在从库上恢复主库的备份并查看从库有哪些库,确保与主库一致 [root@23liuzhenchao ~]# mysql -uroot -p'liu123!' < /opt/all-201905151640.sql mysql: [Warning] Using a password on the command line interface can be insecure. [root@23liuzhenchao ~]# mysql -uroot -p'liu123!' -e 'show databases;' mysql: [Warning] Using a password on the command line interface can be insecure. +--------------------+ | Database | +--------------------+ | information_schema | | liuzhenchao | | mysql | | performance_schema | | sys | +--------------------+ //解除主库的锁表状态,直接退出交互式界面即可 mysql> quit Bye
3.3.2 在主数据库里创建一个同步账号授权给从数据库使用
mysql> grant replication slave on *.* to 'repl'@'192.168.56.23' identified by 'liu123!'; Query OK, 0 rows affected, 1 warning (0.00 sec) mysql> flush privileges; Query OK, 0 rows affected (0.00 sec)
3.3.3 配置主数据库
//重启mysql服务[root@20liuzhenchao ~]# service mysqld restartShutting down MySQL............ SUCCESS! Starting MySQL. SUCCESS! [root@20liuzhenchao ~]# ss -antl|grep 3306LISTEN 0 80 :::3306 :::* //查看主库的状态mysql> show master status;+------------------+----------+--------------+------------------+-------------------+| File | Position | Binlog_Do_DB | Binlog_Ignore_DB | Executed_Gtid_Set |+------------------+----------+--------------+------------------+-------------------+| mysql-bin.000002 | 154 | | | | +------------------+----------+--------------+------------------+-------------------+ 1 row in set (0.00 sec)
3.3.4 配置从数据库
[root@23liuzhenchao ~]# vim /etc/my.cnf[mysqld]datadir=/opt/datasocket=/tmp/mysql.sock# Disabling symbolic-links is recommended to prevent assorted security risks symbolic-links=0 //添加如下内容 relay-log=mysql-relay-bin server-id=3 //重启从库的mysql服务 [root@23liuzhenchao ~]# service mysqld restart Shutting down MySQL.. SUCCESS! Starting MySQL. SUCCESS! [root@23liuzhenchao ~]# ss -antl|grep 3306 LISTEN 0 80 :::3306 :::* //配置并启动主从复制 mysql> change master to master_host='192.168.56.20',master_user='repl',master_password='liu123!',master_log_file='mysql-bin.000002',master_log_pos=154; Query OK, 0 rows affected, 2 warnings (0.30 sec) mysql> start slave; Query OK, 0 rows affected (0.00 sec) //查看从服务器状态 mysql> show slave status\G *************************** 1. row *************************** Slave_IO_State: Waiting for master to send event Master_Host: 192.168.56.20 Master_User: repl Master_Port: 3306 Connect_Retry: 60 Master_Log_File: mysql-bin.000002 Read_Master_Log_Pos: 154 Relay_Log_File: mysql-relay-bin.000002 Relay_Log_Pos: 320 Relay_Master_Log_File: mysql-bin.000002 Slave_IO_Running: Yes //此处必须为yes Slave_SQL_Running: Yes //此处必须为yes
3.3.5 测试验证
在主服务器的liuzhenchao.student表中插入数据:
mysql> use liuzhenchao;Reading table information for completion of table and column namesYou can turn off this feature to get a quicker startup with -ADatabase changedmysql> insert student values(4,'liu'),(5,'zhen'),(6,'chao');Query OK, 3 rows affected (0.01 sec)Records: 3 Duplicates: 0 Warnings: 0mysql> select * from student;+----+-----------+| id | name | +----+-----------+ | 1 | zhangshan | | 2 | lisi | | 3 | wangwu | | 4 | liu | | 5 | zhen | | 6 | chao | +----+-----------+ 6 rows in set (0.00 sec)
在从数据库中查看数据是否同步:
mysql> select * from liuzhenchao.student;+----+-----------+| id | name |+----+-----------+| 1 | zhangshan || 2 | lisi || 3 | wangwu || 4 | liu || 5 | zhen || 6 | chao |+----+-----------+6 rows in set (0.00 sec)